Converting a photograph into an SVG file opens up possibilities for custom portraits, pet photos on engraved products, and unique one-of-a-kind projects. However, the conversion process involves trade-offs — photos are inherently different from vector art. Here's how to do it well.
Understanding the Challenge
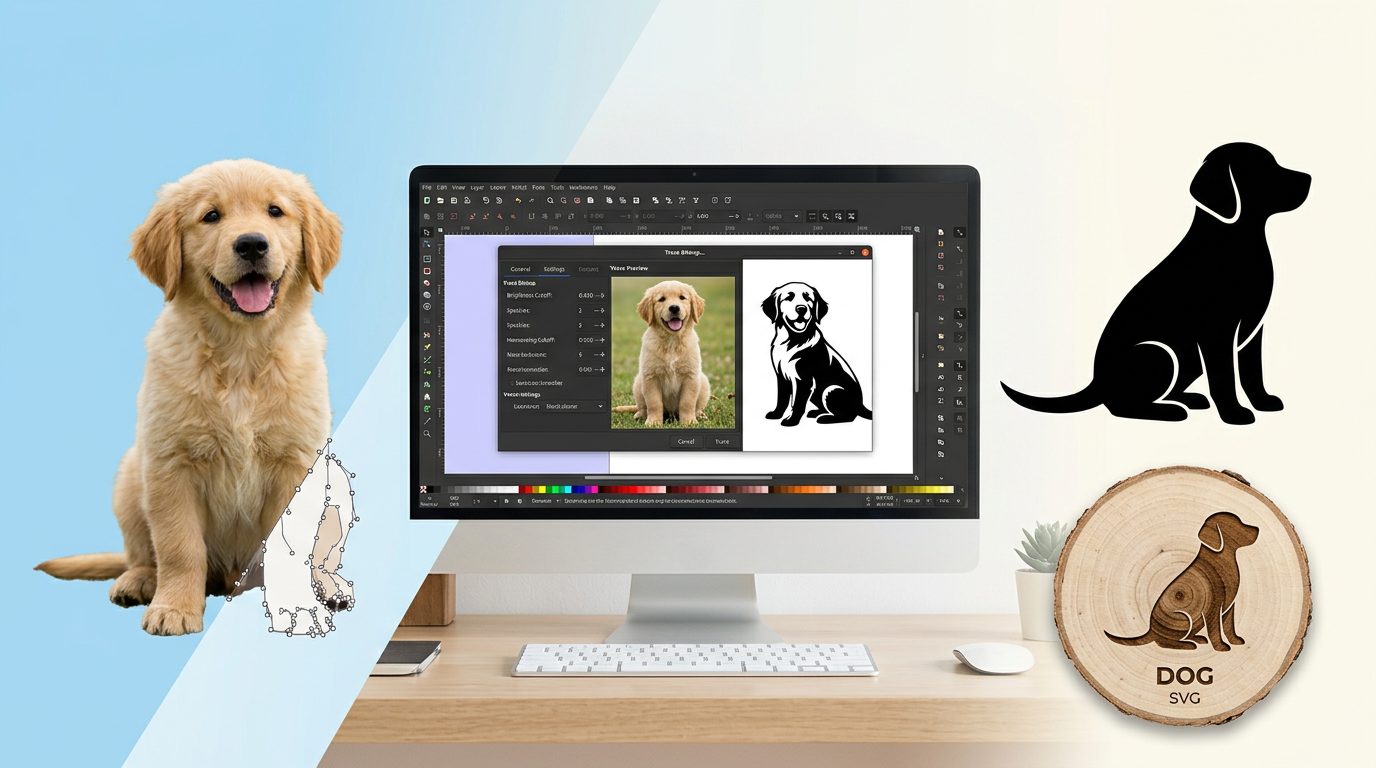
Photos are raster images — millions of colored pixels arranged in a grid. SVG files are vector graphics — mathematical paths defining shapes. Converting from one to the other requires "tracing" — the software analyzes the photo and creates vector paths that approximate the image.
The result is never a perfect copy of the photo. Instead, you get a simplified, graphic interpretation — similar to a poster or stencil version of the original image. For crafting purposes, this stylized look often works better than a photo would anyway.
Method 1: Craftgineer Photo Converter (Recommended)
Craftgineer's Photo Converter is the fastest way to turn a photo into clean line art ready for cutting or engraving. Upload your photo, and the AI converts it into a high-contrast line-art or engraving-style image — no manual tracing needed.
- Best for: Pet portraits, custom silhouettes, memorial engravings, and any project where you want a stylized line-art version of a photo
- Output: Clean line art optimized for laser engraving and vinyl cutting
- Cost: 1 credit per conversion
After converting your photo to line art, run the result through MonoTrace (free) to vectorize it into a clean SVG file.
Method 2: Craftgineer MonoTrace (Free Vectorizer)
MonoTrace is a free PNG-to-SVG vectorizer that converts raster images into clean vector paths. If your photo already has good contrast or you've preprocessed it into a black-and-white image, MonoTrace can vectorize it directly without any cost.
- Upload your image (PNG, JPG, or WebP)
- Adjust the threshold and smoothing settings
- Download the resulting SVG — clean paths ready for your cutting machine or laser
MonoTrace works best with high-contrast images. For photos that need more processing, use Photo Converter first to create the line art, then MonoTrace to vectorize it.
Method 3: Inkscape (Free Manual Option)
If you prefer full manual control, Inkscape's built-in Trace Bitmap function converts photos to SVG:
- Open the photo in Inkscape — File > Open or drag the image onto the canvas
- Select the image — Click on the photo to select it
- Trace — Go to Path > Trace Bitmap (Shift+Alt+B)
- Choose a mode:
- Brightness Cutoff — Creates a simple black-and-white silhouette. Good for strong contrast images.
- Edge Detection — Traces the outlines of shapes. Produces a line-art effect.
- Multiple Scans (Brightness Steps) — Creates multiple layers at different brightness levels, producing a more detailed, multi-toned result.
- Adjust the threshold — This controls how much detail is captured. Lower values = less detail (cleaner), higher values = more detail (busier).
- Click Apply — The traced vector is created on top of the original image
- Delete the original photo — Click on the raster image beneath and delete it, leaving only the vector trace
- Save as SVG
Inkscape gives you the most manual control over the tracing process, making it a good fallback for tricky images that need fine-tuning. For more Inkscape skills, see our Inkscape editing guide.
Preparing Photos for Best Results
The quality of your trace depends heavily on the quality and characteristics of the source photo:
- High contrast works best — A subject that's clearly distinct from the background traces cleanly. A dark dog on a white background traces better than a gray dog on a gray couch.
- Remove the background first — Use a free background removal tool to isolate the subject before tracing. This dramatically improves results.
- Crop tightly — Remove unnecessary surrounding areas. The tighter the crop, the more detail in the trace.
- Increase contrast — Boost contrast in a photo editor before tracing. This helps the tracing algorithm distinguish edges.
- Use the highest resolution available — More pixels = more detail for the tracer to work with
Best Use Cases for Photo-to-SVG
Pet Portraits
A traced pet photo creates a striking silhouette or stylized portrait. These work beautifully engraved on wood, cut from vinyl, or carved on a CNC. Multi-level brightness traces produce particularly impressive engraved pet portraits.
Custom Silhouettes
Profile photos of people trace into elegant silhouettes for wedding decor, family portraits, and commemorative items.
Laser Engraving Portraits
For laser engraving, a multi-level trace (several brightness steps) produces a grayscale-like result that looks almost photographic when engraved on light wood.
Memorial Items
Converting a photo of a loved one or pet into a vector for engraving creates a lasting memorial piece that's more artistic than a direct photo reproduction.
Common Issues and Solutions
Too Much Detail (Noisy Trace)
Reduce the detail level or increase the smoothing setting. Very detailed traces produce files with thousands of nodes that slow machines and produce messy results. Simpler is usually better for cutting and engraving.
Lost Important Features
If key features (like eyes or facial features) disappear in the trace, try a different mode or adjust the threshold. Sometimes manually editing the result in Inkscape — adding back missing elements — gives the best outcome.
File Is Too Large
Highly detailed traces create large SVG files. Use Path > Simplify in Inkscape to reduce nodes while preserving the overall shape. This is especially important for cutting machines that struggle with complex files.
When to Use Pre-Made Designs Instead
Photo conversion works for custom, one-off projects. But for general-purpose designs — animal silhouettes, nature scenes, decorative elements — professionally designed SVG files will always produce cleaner, more consistent results than photo traces.
If you want a completely custom vector design without starting from a photo, Craftgineer's Vector Studio generates AI-powered vector designs from text descriptions — describe what you want and get a cutting-ready SVG.
Browse our design collections for professionally optimized SVG files. From animal silhouettes to detailed scenes, every file is built as a clean vector from the start — no tracing artifacts or excess nodes.
For more on working with SVG files, see our beginner's guide and resizing guide.