You unboxed the Cricut, downloaded a design pack, and now you are staring at a folder of mystery files while Design Space stares back at you. Maybe the upload button rejected your file. Maybe the design came in as one giant blob when the listing clearly showed three colors. Maybe it cut, but at postage-stamp size.
Every one of those problems has a two-minute fix, and most of them come down to understanding what Design Space actually does with an SVG when you feed it one. This guide walks the whole road: uploading, resizing, layers, the Attach button that solves half of all beginner frustration, and getting a clean cut at the end.
Tip
Short answer: unzip the download first, upload the .svg file through Upload > Upload Image, set the real-world size before anything else, and use Attach (not Group) when the layout of the pieces has to survive the trip to the cutting mat.
What you need before you start
Four things, and you likely have three already:
- A free Cricut account, created at design.cricut.com.
- Design Space installed on Windows, Mac, iOS, or Android. The desktop version is the comfortable place to learn; the mobile app works but hides tools in different places.
- Your SVG files downloaded and unzipped. Our packs arrive as a ZIP containing SVG, PNG, JPG, PDF, and EPS versions of every design. For a Cricut you want the SVG. On Windows, right-click the ZIP and choose Extract All; on a Mac, double-click it.
- Material and the right mat. Vinyl, cardstock, iron-on, whatever the project calls for.
One thing you do not need is Cricut Access. That subscription unlocks Cricut's own image library. You can upload and cut your own SVGs without a Cricut Access subscription.
How Design Space reads an SVG
Understanding this one section prevents most surprises later, because Design Space has opinions about vector files.
Inspect the imported layers. SVG shapes, fills and grouping affect the imported structure. One color can contain several separate shapes or layers, so check the Layers panel rather than assuming that three colors always produce exactly three entries.
Strokes are effectively ignored. A path's outline width means nothing to a cutting machine; the blade follows the path itself. A design that relies on thick strokes for its look will import thinner than expected. This is why properly built cut files use filled shapes rather than stroked lines. Every design we sell is drawn as filled, closed paths for exactly this reason, so what you see in the preview is the shape the blade will actually follow.
Size on arrival is not gospel. SVG is a scalable format, and the size a file imports at depends on how the file declares its dimensions. Never assume the imported size is the intended size. Check it and set it yourself, which takes ten seconds and is covered in Step 3.
Groups survive the trip. Elements grouped in the file stay grouped on the canvas, which keeps multi-part designs tidy instead of raining loose pieces into your Layers panel.
 Dog Lover Silhouette Pack32 designs, commercial license included$3.99
Step 1: Upload your SVG
Open Design Space, start a new project, and click Upload in the left toolbar, then Upload Image. Drag the SVG into the window or browse to it.
Because SVG is a vector format, Design Space skips the background-removal cleanup steps it forces on JPG and PNG uploads. You get a preview, you click Upload, and the file lands in your library. That shortcut is one of the quiet reasons SVG is the format of choice for cutting machines.
When the upload fails
Three culprits cover nearly every failed upload:
- You selected the ZIP. Design Space cannot open an archive. Extract it first, then pick the file that ends in .svg.
- You selected the wrong format. The PNG and JPG in the folder are previews and print files, not cut files. They will upload, but as images that need tracing, not as clean vector paths.
- The file is heavy. A design with thousands of nodes takes longer to process. Give it a minute. Our files are vectorized and cleaned before they ship precisely to keep node counts sane, which keeps uploads quick and cutting smooth.
Step 2: Add it to the canvas
Find the design under Recently Uploaded, click it, and click Add to Canvas. It appears on the virtual mat, usually selected and ready to move.
If the design looks like a single dark shape when you expected colors, do not panic yet. Open the Layers panel on the right. Multi-layer designs often preview small and dark but list every layer separately, and the layer list is the truth.
Step 3: Set the size first
This is the step to make a habit, because it is the cheapest mistake to prevent and the most annoying one to discover mid-cut.
Select the design and look at the dimension readout in the top toolbar. Type the width you actually want; Design Space keeps proportions locked by default, so the height follows. Dragging a corner handle works too, but typing an exact number is how you make a 3.5 inch decal actually come out 3.5 inches.
For machines using a standard 12 × 12 inch mat, a typical maximum cut area is about 11.5 × 11.5 inches. A 12 × 24 mat adds length, not width. Check the area for your selected machine and material, then split or rotate a design that does not fit.
Sizing vectors up and down costs nothing in quality, which is the entire magic of the format. If you want the deeper story on that, our guide to resizing SVG files without losing quality covers it.
Step 4: Work the Layers panel
The Layers panel on the right side is mission control for any multi-color design. Each color layer cuts from its own sheet of material, and the panel is where you manage that.
- Hide a layer with the eye icon when you only want part of the design. A name and a paw print can come from the same file with the paw hidden.
- Recolor a layer by selecting it and picking a new color from the swatch in the toolbar. The color is just a label telling Design Space which cuts belong on the same mat, so match it loosely to your vinyl colors to keep the mats straight.
- Reorder layers by dragging them in the panel, which changes the stacking preview on canvas.
Our multi-layer packs keep this predictable: one fill color per layer, no stray sub-groups, so what lists in the panel maps one-to-one onto sheets of vinyl. For the full picture of how layered files are built and assembled, see understanding SVG layers.
Step 5: Group, Attach, Weld, Flatten
Four buttons, four different jobs, and mixing them up is the classic Design Space stumble.
| Tool | What it does | When to use it |
|---|---|---|
| Group | Moves elements together on the canvas | Organizing while you design |
| Attach | Locks positions for the mat, pins Draw and Score to a layer | Any time layout matters in the final cut |
| Weld | Permanently merges overlapping paths into one shape | Joining script letters, removing overlap lines |
| Flatten | Merges layers into one printable image | Print Then Cut only |
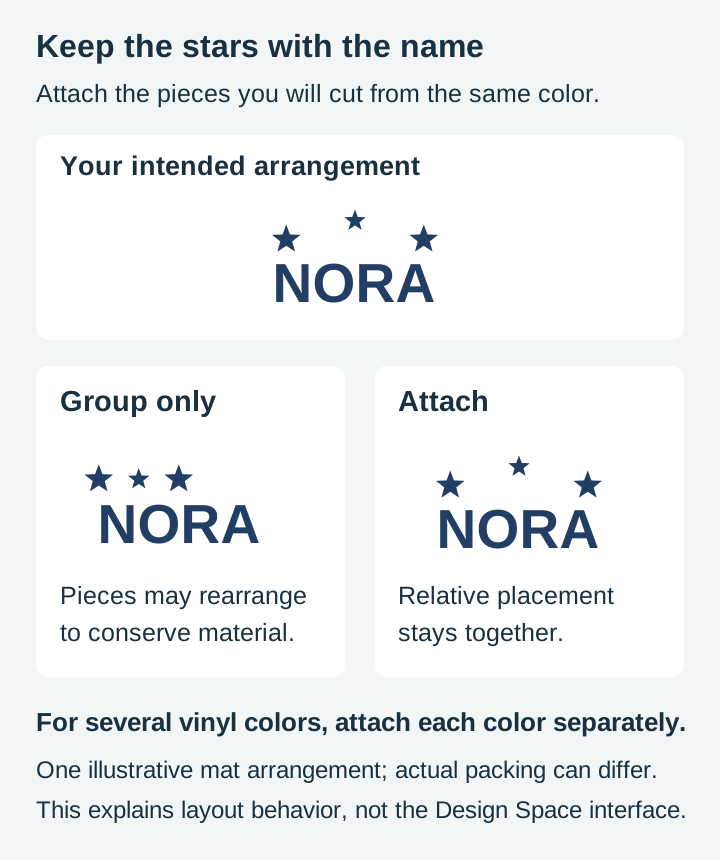
The one that matters most: Group does not survive the Make It screen. Design Space rearranges ungrouped and merely-grouped pieces to save material, so your carefully spaced name under a silhouette becomes a jumble on the mat. Attach is the tool that preserves layout. Select the pieces that must stay put relative to each other and attach them within each material color. Attaching different cut colors together puts them on the same material layer; keep separate color groups for layered vinyl.
Weld deserves respect because it is destructive: once overlapping shapes merge, they are one path. It is the right tool for script text where letters overlap, and the wrong tool for anything you might want to separate later. Duplicate first if unsure.
Flatten belongs to a different workflow entirely, turning vector layers into a single image for Print Then Cut projects, where your printer makes the colors and the Cricut just cuts the outline.
Two bonus tools worth knowing: Contour and Offset
Contour lets you hide individual cut paths inside a single layer without editing the file. Select a layer, click Contour at the bottom of the Layers panel, and click any interior shape to toggle it off. Want the cat silhouette without its whiskers, or a design's frame without the text inside it? Contour does it in seconds, non-destructively, and the hidden paths come back with another click. It only works on ungrouped single layers, so ungroup first if the button is grayed out.
Offset builds a slightly larger copy around whatever you select, which is how you make a backing layer or sticker border that hugs the design's shape. Set the distance, choose rounded corners for organic designs, and Design Space generates the outline as a new layer. An offset behind a detailed silhouette in a contrasting vinyl color makes a two-layer piece out of a one-layer file, which is the cheapest visual upgrade in the whole program.
Step 6: Make It
Click Make It and Design Space sorts your layers onto virtual mats, one mat per color. Review the layout, then the two checkboxes that save projects:
Mirror, for iron-on. Standard cut heat-transfer vinyl is usually cut carrier-side down, so mirror the artwork. Printable and specialty products may have different instructions. Inspect the Mirror setting for each mat. Design Space may apply Auto Mirror for supported materials; confirm the result rather than assuming it is on.
Material selection. Explore Air 2 and older models have a Smart Set Dial. Explore 3 and later, Maker, Joy, and Venture use material selection in Design Space. See Cricut's material-setting guide. The settings below are Design Space's own named presets from Cricut's material list, matched to the material you are actually cutting. Treat them as the starting point Cricut intends them to be, and run a small test cut when a material is new to you, since Cricut's own guidance is that results vary by machine and brand of material:
| Material | Design Space preset | Notes |
|---|---|---|
| Adhesive vinyl | Vinyl | StandardGrip mat |
| Iron-on (HTV) | Iron-On | Mirror on, shiny side down |
| Cardstock | Medium Cardstock | LightGrip for thin stock, StandardGrip for heavy |
| Sticker paper | Sticker Paper | Pairs with Print Then Cut |
These settings control pressure and blade behavior, and Cricut maintains them per machine, so trust the named preset over guesswork. Load the mat, press the flashing button, and let it run.
Step 7: Weed and apply
Pull the mat off the material rather than the material off the mat, flexing the mat away so the vinyl releases flat instead of curling.
Weeding, pulling away the waste vinyl around the design, is where file quality becomes something you can feel in your hands. Chunky shapes weed fast. Thin strokes and tiny counters, the enclosed holes inside letters, are where waste tears and tweezers come out. Our sayings packs are drawn with weeding in mind, with stroke widths that hold together at gift size rather than only at poster size.
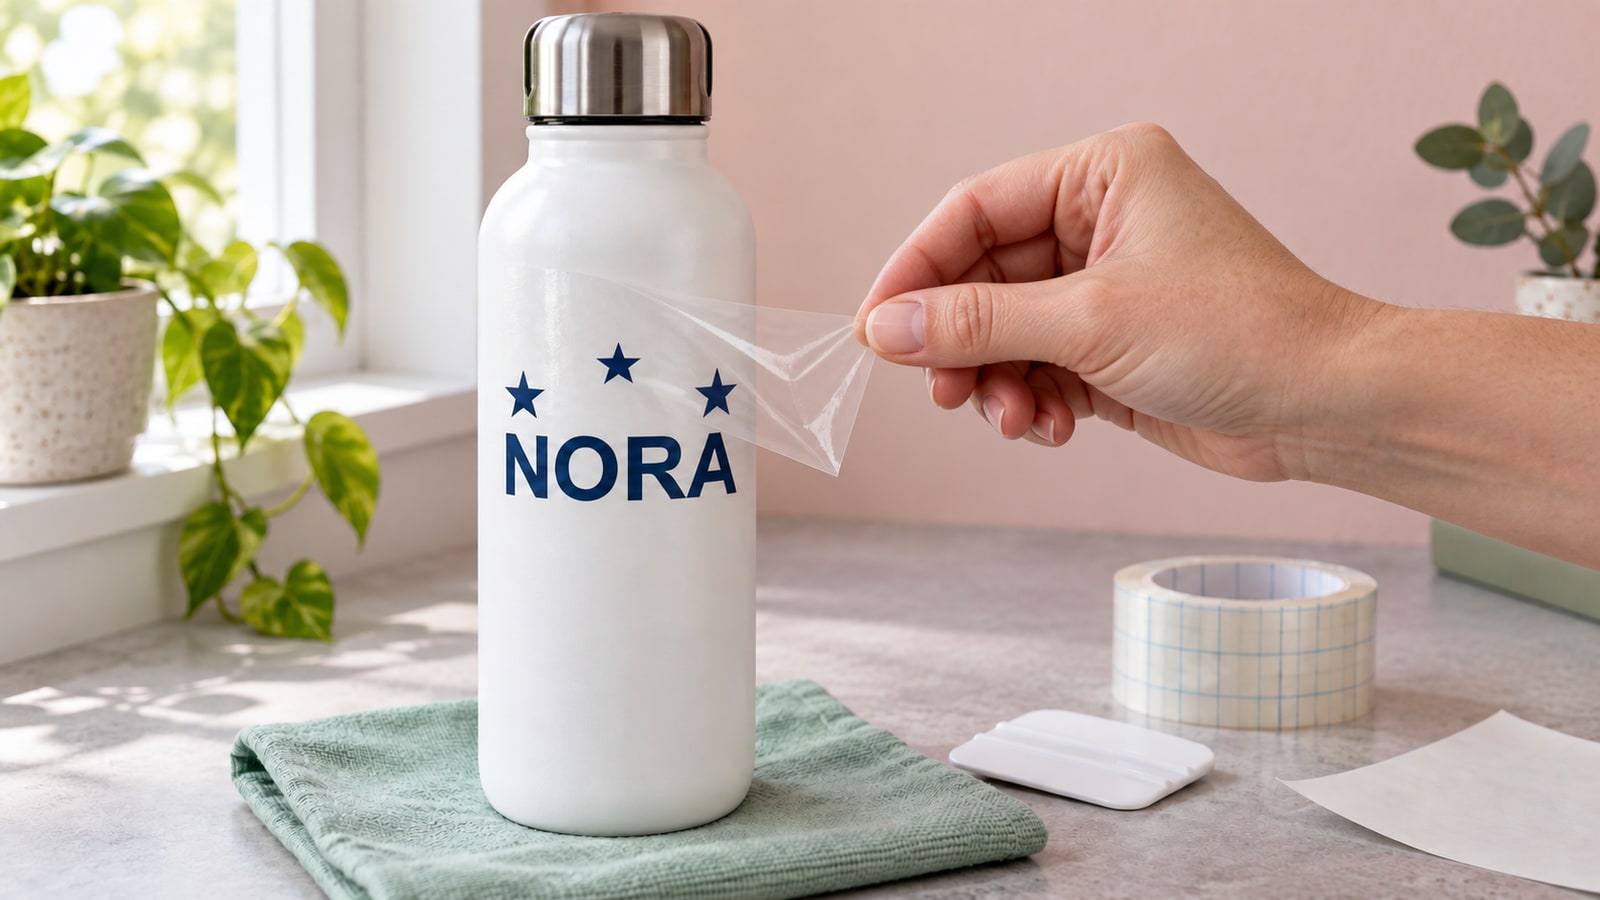
Then transfer tape over the design, burnish, peel the backing, position, burnish again, and peel the tape at a sharp angle. First full project? Our first vinyl project guide walks that half of the craft in detail.
Troubleshooting the common failures
Not cutting through: add pressure or run a second pass, and inspect the blade for lint. A strand of vinyl wrapped around the blade tip mimics a dull blade perfectly.
Cut the wrong size: the size was wrong on the canvas. It happens to everyone once; the Step 3 habit ends it.
Fine details tearing: the design is too small for its own detail level. Scale it up, swap to a fresh blade, or pick a design drawn for small sizes. Detail that engraves beautifully at 4 inches on a laser does not necessarily weed at 2 inches in vinyl.
Design Space slow or hanging on upload: oversized files, usually ones with embedded raster images or absurd node counts, are the usual cause. Clean vector-only files import in seconds.
Cut something real
The fastest way to make all of this stick is one full project, upload to weeded decal, with a file that behaves. Every pack below is $3.99, arrives in all five formats with the SVG ready for Design Space, and includes a commercial license, so the first decent thing off your mat can be the first thing you sell.
 Split Monogram Designs50 designs, commercial license included$3.99
 Funny Cat Sayings48 designs, commercial license included$3.99
Still deciding whether the Cricut ecosystem is even your ecosystem? Our Cricut vs Silhouette comparison lays out both sides, and the Silhouette Studio guide is this same walkthrough for the other camp.
Designs for this project
Frequently Asked Questions
Why won't my SVG file upload to Cricut Design Space?
The most common cause is trying to upload the ZIP file itself. Extract the ZIP first, then select the file ending in .svg, not the PNG or JPG version. Very complex designs can also take a while to process, so give a large file a minute before assuming it failed.
Do I need Cricut Access to use my own SVG files?
No. Cricut Access is a subscription for Cricut's own image library. Uploading and cutting your own SVG files is free on every Design Space account.
How do I keep the pieces of my design from moving apart on the mat?
Select the pieces of one material color and use Attach. Group organizes the canvas; Attach preserves their relative positions on the cutting mat. Attach each color separately for layered projects.
Why did my multi-color design import as one single-color layer?
Some files are genuinely drawn as one piece, and some editors flatten layers on export. Check the Layers panel: if there is only one layer, the file has no separate color groups to cut. Our multi-layer packs keep one fill color per layer so each color arrives ready to cut separately.