You bought a design pack, and it is nearly right. The wording needs a name in it. One element has to go. The colours are fine for the preview but not for the vinyl you actually own. And the obvious tool for the job costs a monthly subscription you would rather not start.
Inkscape solves all of that for nothing. It is a full vector editor, open source, available on Windows, macOS and Linux, and it edits SVG natively because SVG is its native format rather than something it exports to. That last point matters more than it sounds, because it means nothing gets translated or approximated on the way in or out.
Tip
Short answer: download Inkscape from inkscape.org, open the SVG, and learn four things: the Selection tool for moving and resizing, Shift+Ctrl+F for colours, the Text tool for adding names, and Path > Object to Path before you save. That covers the vast majority of real edits to a cut file.
Menu wording shifts a little between Inkscape versions, so this guide describes what each command does rather than reciting one release's exact menu tree. The keyboard shortcuts have been stable for years and are the safest way to find anything.
Setting up so your edits mean something
Install Inkscape and open a file with File > Open, or drag it onto the window. There is no account, no trial and no watermark.
Before the first real edit, do one piece of housekeeping. Open Document Properties (Ctrl+Shift+D) and set the display units to whatever you think in, inches or millimetres. Every size readout in the toolbar then speaks your language, which removes an entire category of "why is my design 96 units wide" confusion.
The tools you will actually use live in the left toolbar:
- Selection tool (S or F1). The arrow. Click to select, drag to move, corner handles to resize. Click a second time on a selected object to switch the handles to rotation.
- Node tool (N or F2). Edits the individual points that make up a path. This is where real shape surgery happens.
- Text tool (T). Adds and edits text.
- Fill and Stroke panel (Shift+Ctrl+F). Colours, both the fill inside a shape and the stroke around it.
Two more panels earn their keep: Objects, which lists everything in the document, and the XML editor (Ctrl+Shift+X), which shows the raw file. You do not need the XML editor for normal work, but it is the fastest way to answer "what actually is this thing I selected".
 Split Monogram Designs50 designs, commercial license included$3.99
Changing colours
- Click the element you want to recolour.
- Open Fill and Stroke with Shift+Ctrl+F.
- On the Fill tab, choose flat colour and pick your colour.
- For an exact value, type the hex into the RGBA field at the bottom. It takes eight digits, six for the colour and two for opacity, so
1E293BFFis fully opaque.
If the shape also has an outline, the Stroke Paint tab controls it separately. A shape can have a fill and no stroke, a stroke and no fill, or both, and knowing which you are looking at explains a lot of confusing behaviour.
For a multi layer design, remember that the fill colours are labels rather than material instructions. Changing them changes how your cutting software groups the layers, so recolour deliberately: two layers given the same fill will merge into one mat. Our guide to what SVG layers actually are explains why software keys off colour.
Deleting elements
Click the element and press Delete. That is the whole operation when the element is loose.
Most of the time it will not be loose, because designers group things. Double click to step inside a group and select the individual element, then delete. You can keep double clicking to descend through nested groups, and press Escape to climb back out. Ungrouping with Ctrl+Shift+G also works but scatters the structure of the file, so entering the group is usually tidier.
If clicking selects the wrong thing, hold Alt and click repeatedly. Alt+click cycles down through overlapping objects, which is how you grab the shape hiding underneath the one on top.
Adding text, and the one rule about it
- Choose the Text tool (T).
- Click on the canvas and type.
- Set the font, size and spacing in the tool control bar along the top.
- Switch back to the Selection tool to move and scale the block.
- Convert it: select the text and press Shift+Ctrl+C (Path > Object to Path).
That last step is not optional for anything heading to a machine. Live text is a reference to a font by name. Open the file on a computer without that font and the software substitutes something else, silently, and your carefully spaced name sign comes out in a default serif. Once converted, the letters are outlines and nothing can swap them.
Convert as the last step before saving, because converted text is no longer editable as text. The usual workflow is to keep a working file with live text and export a separate converted copy for the machine.
For letters that arrive already built as cut-ready geometry, alphabet packs sidestep the font question entirely.
 Kids Name Sign Designs45 designs, commercial license included$3.99
 Wood Letters Design Pack40 designs, commercial license included$3.99
Resizing exactly
Drag a corner handle to resize freehand, holding Ctrl to keep the proportions. For a real dimension, use the W and H fields in the tool control bar and click the lock icon between them so the aspect ratio holds.
One toggle in that same bar deserves attention. There is a small button that controls whether stroke width scales along with the object. Scale strokes with the object when their visible width is part of the artwork. Keep a fixed stroke width only when your workflow requires it for a cut or score convention, then check the imported operation. A displayed stroke width is not automatically the physical width a cutter removes.
Select everything before resizing a multi part design. Resizing pieces individually scales each one around its own centre and quietly destroys the alignment between them. There is more on scaling behaviour in our resizing guide.
Combining designs from different files
- Open the first SVG.
- Use File > Import to bring in the second one. Import places it inside the current document; Open would create a new window instead.
- Choose to embed rather than link if you are prompted, so the artwork lives inside your file.
- Position and size each piece.
- Select everything and group with Ctrl+G.
- Save As a new filename so the originals stay untouched.
Copy and paste between two open Inkscape windows works too and is often quicker for a single element.
Path operations, and what they are actually for
The Path menu holds the boolean operations, and they are the difference between rearranging a design and genuinely making a new one.
| Operation | Shortcut | What it does | Real use |
|---|---|---|---|
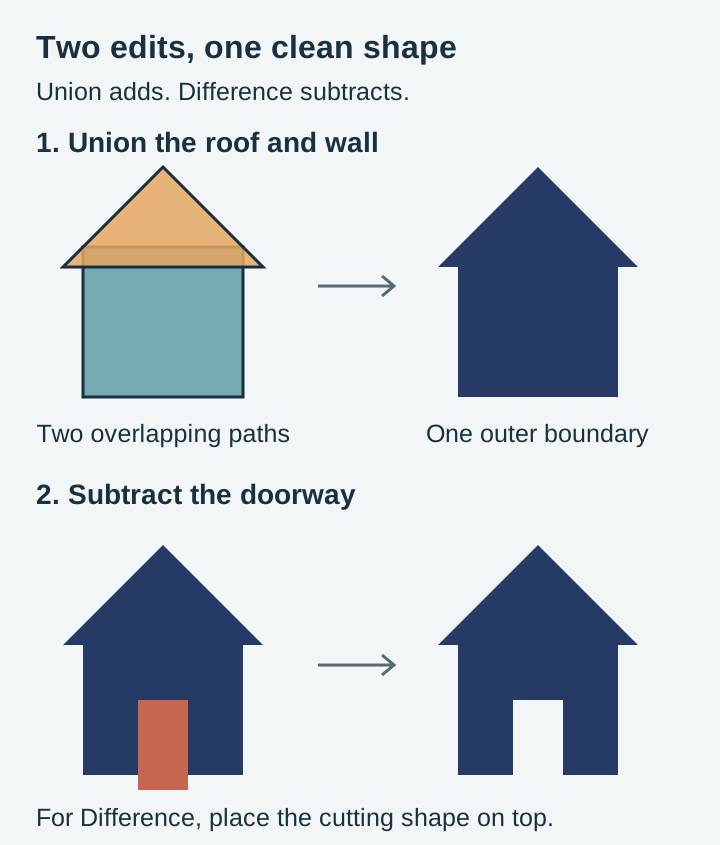
| Union | Ctrl++ | Merges overlapping shapes into one | Joining script letters so they cut as a single piece |
| Difference | Ctrl+- | Subtracts the top shape from the one below | Knocking a name out of a solid tag or plaque |
| Intersection | Ctrl+* | Keeps only the overlapping area | Cropping a pattern to a shape |
| Exclusion | Ctrl+^ | Keeps everything except the overlap | Interlocking ring effects |
| Break Apart | Ctrl+Shift+K | Splits a compound path into separate paths | Freeing counters, such as the hole in a letter O |
Union is the one that saves projects. Connected script lettering that looks joined on screen is often several separate letter shapes overlapping each other. Cut as separate overlapping outlines, the blade can cut through joins you intended to keep. Select the lot, press Ctrl++, and it becomes one continuous path.
Break Apart is its opposite and comes with a warning. It removes the compound path relationship, so the hole in a letter O stops being a hole and becomes a filled disc sitting on top. If that happens, select the outer shape and the counter together and use Path > Combine (Ctrl+K) to restore the relationship.
Layers, groups and why the distinction is small
Open the Layers panel with Shift+Ctrl+L. Layers give you an eye icon for visibility and a lock icon to prevent accidental edits, both of which are useful when you are working on one part of a busy design.
Most design files use groups rather than Inkscape layers, because groups are what the SVG standard actually defines and layers are Inkscape's convention built on top of them. Practically, cutting software treats them the same way. Ungroup with Ctrl+Shift+G to get at contents, and expect to do it more than once where groups are nested.
Cleaning a file so it actually cuts
This is where Inkscape earns its place in a maker's toolkit, and it is the part most tutorials skip. A file can look perfect on screen and behave badly at the machine for reasons that are invisible until you check.
Stray objects outside the canvas. Press Ctrl+A and look at the selection bounding box. If it extends well beyond the artwork, something is parked out in space. It might be a leftover node, an invisible rectangle, or a zero opacity shape. It will enlarge your design's bounding box and shrink everything else on the mat. Find it in the Objects panel and delete it.
Open paths where you expect closed ones. Closed shapes are needed for enclosed cutouts and many pocket or V-carve operations; open paths are valid for some score and engraving operations. Inspect the endpoints with the Node tool and join only the pair intended to meet. A visible fill alone does not prove a path is closed, because SVG can fill an open subpath as though its ends were connected.
Strokes standing in for cut lines. A shape defined only by a stroke has no fill, and some software reads that very differently from a filled shape. For laser work in particular, decide whether each element should be a filled area to engrave or a stroked line to cut, and make it explicitly one or the other. Our LightBurn guide goes into how that maps onto laser layers.
Absurd node counts. Auto traced artwork often carries thousands of nodes describing a curve that needs a few dozen. Select the path and press Ctrl+L to simplify. Press it once, look, and press again only if needed, because repeated simplification rounds off the detail you paid for. Watch a sharp corner while you do it, since corners are the first thing to soften.
Document bloat. File > Clean Up Document removes unused definitions such as orphaned gradients and markers. It is a safe operation and it can shrink a file noticeably.
Clipping and masks. Clips look like edits but are not. The clipped away geometry is still in the file, and some machines and converters ignore the clip entirely, which produces a design that suddenly has parts you thought you had removed. Where a clip defines the final shape, apply it destructively with a Difference or Intersection instead.
Saving and exporting
Save As offers several SVG flavours. Plain SVG is the one to send to a machine. Inkscape SVG adds Inkscape-only metadata that other programs ignore, useful for a working file and pointless in a delivery file. Optimized SVG strips things aggressively and exposes options such as decimal precision, which is handy for web use and slightly risky for cut files if you cut the precision too far.
For other formats, Save As also writes PDF and EPS, and the export dialog handles PNG with a chosen size or resolution. Newer Inkscape versions consolidate all of this into one export panel; older ones keep PNG separate under File > Export PNG Image (Shift+Ctrl+E). Either way, set the pixel width you actually need rather than accepting the default.
If you are unsure which format the job wants, our format comparison guide lays out what each one is good for.
What Inkscape is not the right tool for
It is a vector editor, so photo work is not its job. Turning a photograph into a cut file means tracing it, and while Inkscape's built in trace works, it tends to produce heavy node counts that need cleaning. Our photo to SVG guide covers the approach properly, and Craftgineer's MonoTrace is a free tool that produces cleaner traces than a default trace does.
It is also not a CAM program. It will not generate toolpaths or G-code for a router, and it will not talk to your cutter. Inkscape prepares the artwork; your cutting or CAM software does the rest.
Two habits worth keeping
Always work on a copy. Duplicate the original file before you touch it, so a bad half hour costs nothing.
And zoom in before saving. Ctrl+scroll zooms, and 3 at a time steps through preset levels. Details that look clean at fit-to-window regularly turn out to have a doubled node, a tiny gap, or a shape sitting a fraction off where you thought. Thirty seconds of zoomed inspection catches most of it.
Make the designs yours
Every pack in our catalogue is $3.99, ships as SVG, PNG, JPG, PDF and EPS, and includes a commercial licence, so personalising a design and selling the finished physical item is exactly what the files are for. Browse the quotes and text collection for signs and monograms that take a name well, or the full shop.
New to cut files? Start with the beginner's guide to SVG files. Working with multi colour designs? Our layered SVG assembly guide picks up where the editing stops.
Designs for this project
Frequently Asked Questions
Is Inkscape really free for commercial work?
Yes. Inkscape is open source under the GNU GPL, with no paid tier, no watermark and no account. Anything you design or edit in it is yours to sell, subject to the licence of the artwork you started from.
Why does my text disappear or change font when I open the file elsewhere?
Live text depends on the font being installed on whatever computer opens the file. Select the text and use Path > Object to Path (Shift+Ctrl+C) to convert the letters into geometry. After that the shapes travel with the file and cannot substitute themselves.
Should I save as Plain SVG or Inkscape SVG?
Plain SVG for anything going to a cutting machine or laser. Inkscape SVG stores extra Inkscape-only data that other programs ignore, which is harmless but pointless in a delivery file. Keep an Inkscape SVG working copy if you want editable layer names, and export Plain SVG for the machine.
Can Inkscape open AI, EPS or PDF files?
PDF and EPS both import, and many AI files open because they are PDF compatible underneath. Expect text in imported PDFs to arrive as paths or with substituted fonts, and check the size after import since page based formats carry their own units.