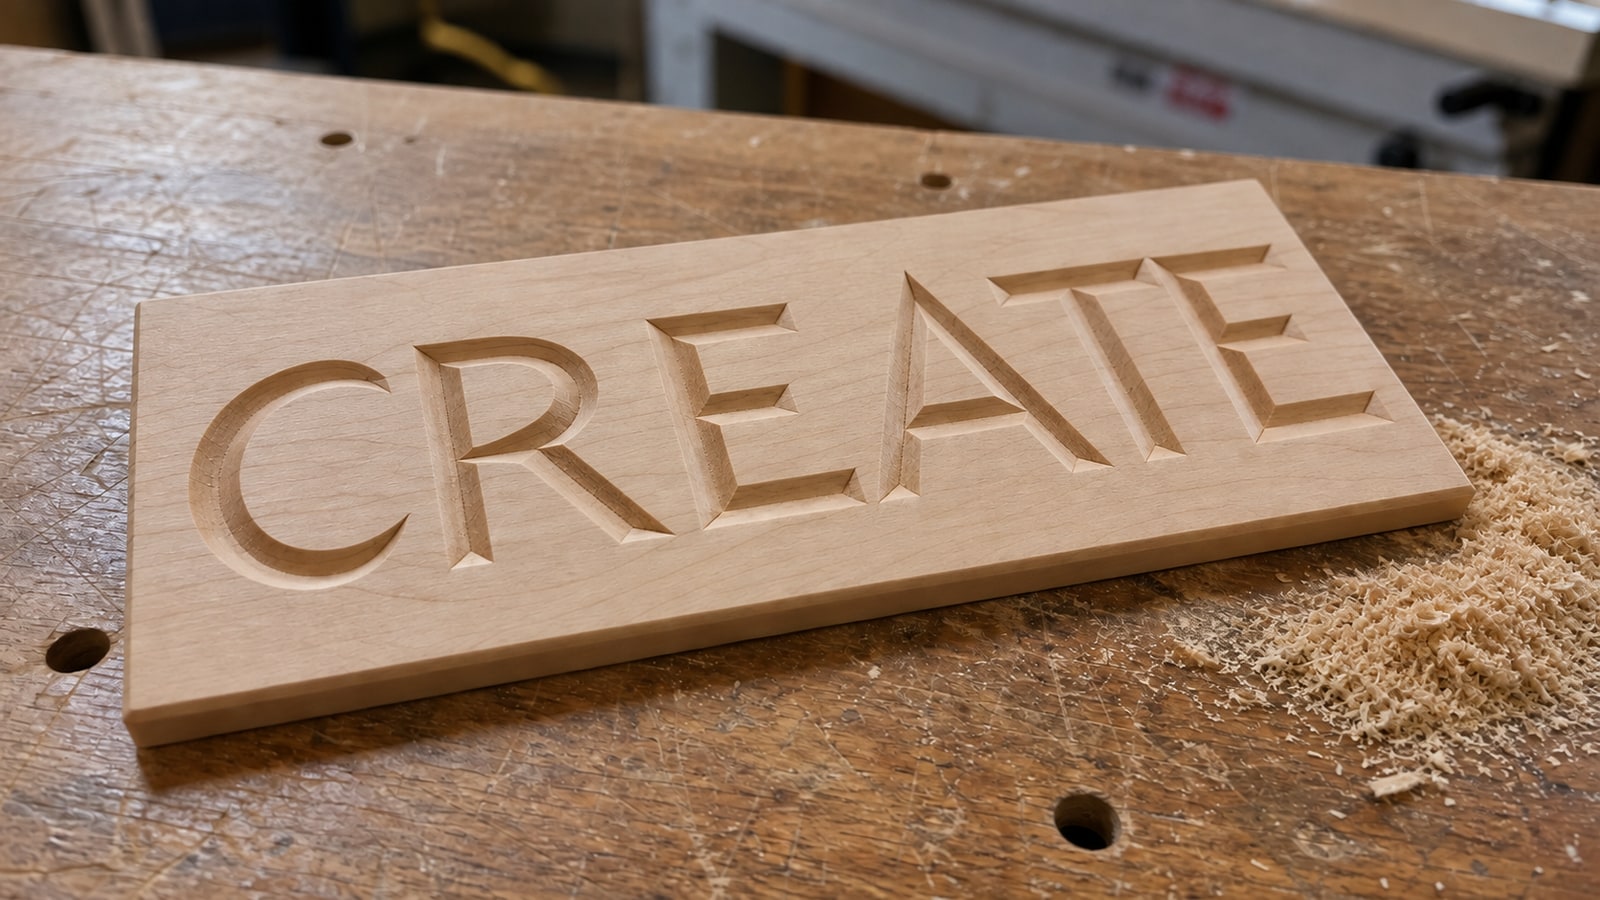
You ran your first sign and it came out looking like a pocket, not a carving. The letters have vertical walls and flat bottoms, the corners are rounded off where they should be sharp, and the whole thing reads as machined rather than carved. Or the CAM software simply refused, telling you it could not calculate a toolpath from your vectors.
V-carving is the technique that makes a CNC sign look like it was cut by hand, and it fails in a small number of predictable ways. Almost all of them come down to two things: understanding what the bit geometry can and cannot do, and giving the software vectors it can actually work with.
Tip
Short answer: a V-bit cuts wider as it goes deeper, so the CAM software varies depth to match the width of your artwork. That only works with closed vector paths. Start with a 60 degree bit, make sure every path is closed before you import, and add a flat clearing pass for any shape too wide for the bit to reach.
The geometry, which is the whole idea
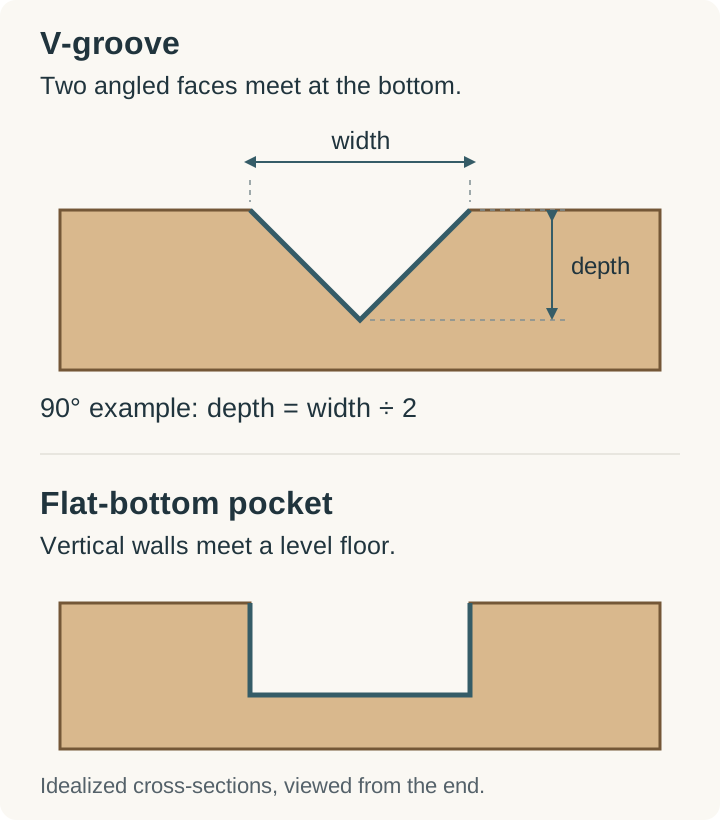
A V-bit is a cone. Push it into wood and it makes a V shaped groove whose width at the surface depends entirely on how deep the tip went. Shallow gives a narrow groove, deep gives a wide one.
V-carving toolpaths run that relationship backwards. The software looks at how wide your design is at every point and works out the depth that produces exactly that width. A serif that tapers to a point gets shallower and shallower until it reaches zero at the tip, which is why V-carved lettering has that crisp needle sharp finish no other toolpath produces.
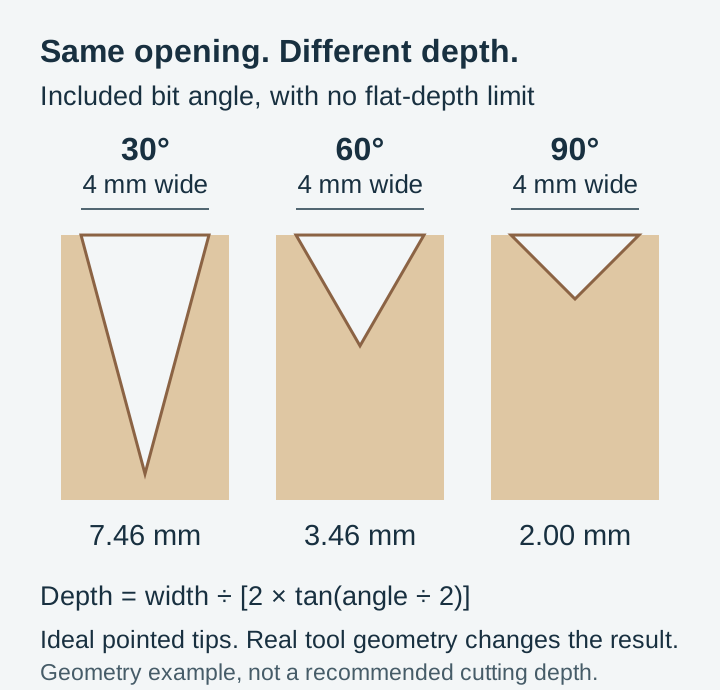
The maths is fixed and worth knowing, because it tells you what a bit can do before you set anything up. For a groove of width w and a bit of included angle a:
depth = (w / 2) / tan(a / 2)
| Bit angle | Depth per 1 unit of width | 1/2 inch wide letter stroke |
|---|---|---|
| 30 degrees | 1.87 | 0.93 inches deep |
| 60 degrees | 0.87 | 0.43 inches deep |
| 90 degrees | 0.50 | 0.25 inches deep |
| 120 degrees | 0.29 | 0.14 inches deep |
Read that table twice, because it explains a lot of surprises. A 30 degree bit on half inch lettering wants to cut nearly an inch deep, which is straight through most sign stock. A 90 degree bit on the same lettering stays a quarter inch deep and is perfectly happy in three quarter inch material.
It also explains the flat bottom problem. Every CAM package has a maximum or flat depth setting. When the artwork is wider than the bit can reach within that limit, the toolpath stops descending and leaves a flat floor. That is not a bug, it is the software refusing to plunge through your workpiece.
Choosing a bit angle
| Bit | Character | Use it for |
|---|---|---|
| 30 degree | Deep, narrow, very fine tip | Small text, fine line art, detailed ornament |
| 60 degree | Balanced depth and detail | Most signs, most lettering, the default choice |
| 90 degree | Wide and shallow, strong shadow lines | Large bold lettering, thick material worries, signs read from a distance |
| 120 degree | Very shallow, broad | Chamfers, wide shallow decorative work, thin stock |
One physical detail the geometry table hides: real V-bits have a small flat at the tip rather than a mathematically perfect point. That tip diameter is your minimum feature size. Any element in the design narrower than the tip cannot be carved as a V at all, and the machine will leave a shallow scratch instead. It is the reason very fine hatching that looks wonderful on screen disappears into fuzz on the board.
 Lake House Signs42 designs, commercial license included$3.99
CAM software
Vectric VCarve Desktop and Pro are the standard for this work, and V-carving is what they were built for. Import the SVG, select the vectors, choose the bit, set a flat depth limit and a clearing tool, and the software does the rest. VCarve Pro adds a larger work area and tiling for oversized jobs.
Carbide Create Pro includes V-carve toolpaths in its paid tier. It is simpler and less configurable than VCarve, and it is a sensible route if you already run a Shapeoko or Nomad.
F-Engrave is free and open source, imports SVG and DXF, and generates V-carve toolpaths. The interface shows its age and it is fussier about input geometry, but it costs nothing and it works, which makes it a fair way to find out whether you like the technique before spending money.
Fusion 360 can produce chamfer and trace toolpaths that approximate some V-carving, though true depth-from-width carving is not its strength. If Fusion is already your CAM, expect to reach for something else for signs.
Preparing the SVG, which is where most jobs are won
Files are what we make, so this section is the part we can speak to first hand. A V-carve toolpath is unusually sensitive to vector quality, far more so than a simple profile cut, because it is doing real geometric analysis of the space inside your shapes.
Every path must be closed. V-carving measures width, and width requires two sides. An open path has no interior, so CAM software either skips it or drops it to a fixed depth line engraving. A gap of a thousandth of an inch counts as open. In Inkscape, select the path with the Node tool, select all nodes, and join the endpoints.
Filled shapes, not strokes. A design drawn with stroke outlines has no closed geometry at all, just centre lines with a display width attached. Stroke width is a rendering property that different programs interpret differently, which is exactly how a design arrives at the wrong scale. Cut-ready files use filled closed paths and no strokes.
No duplicate paths stacked on each other. Two identical outlines sitting on top of one another confuse the width calculation, and the usual result is a toolpath that carves the outline twice or produces nonsense in the overlap. Duplicates are common in files that have been converted between formats repeatedly. A quick way to spot them is to move the top object and see whether anything is hiding underneath.
No self intersecting paths. A path that crosses itself has an ambiguous inside, and CAM software has to guess. Where a design needs crossing strokes, such as connected script lettering, unite the shapes into one path rather than leaving them overlapping.
Compound paths where holes belong. The counter in a letter O has to be a hole, not a separate disc. If it has become a separate shape, select both and combine them so the relationship is restored. Otherwise the machine will carve the counter as a raised island in the middle of the letter.
Text converted to outlines. Live text depends on a font being installed. Convert it before export so the letterforms travel with the file.
Sensible node counts. Traced artwork often carries thousands of nodes where dozens would do. Excess nodes slow toolpath calculation and can produce visible faceting on curves. Simplify carefully and watch the sharp corners, because corner sharpness is exactly what V-carving exists to preserve.
Our Inkscape editing guide covers the mechanics of each of those checks, and the CNC router SVG guide covers the wider file preparation picture.
The workflow
- Import the SVG into your CAM software and set the document units so the design arrives at the size you expect.
- Run a vector check. Most packages have a tool that reports open contours and duplicates. Fix everything it reports before going further, because every one of those becomes a carving defect.
- Define the stock. Set material width, length and thickness, and set the Z zero reference to either the top surface or the machine bed, then stay consistent with how you will actually probe.
- Position the artwork on the virtual stock, with enough margin for workholding.
- Select the vectors to carve and create the V-carve toolpath.
- Choose the bit and the flat depth limit. The limit is what stops the tool descending into a wide area forever. Set it against your material thickness with a safety margin.
- Add a clearing tool for wide areas. A flat end mill removes the bulk quickly and leaves the V-bit to do the edges and fine detail. On a sign with large filled backgrounds this is the difference between a twenty minute job and a two hour one.
- Simulate. Run the 3D preview and look at it properly. Check that the letters come to points, that no area went unexpectedly flat, and that nothing plunged deeper than your stock.
- Post and transfer the file in your machine's flavour of G-code.
- Set up and probe. Secure the workpiece well, since V-carving involves plenty of full depth plunges. Set X and Y zero, then Z zero on the surface.
- Run it, and watch the opening minutes. The first plunge tells you whether your Z zero is right, and that is the failure worth catching early.
Feeds, speeds and the honest answer
We are not going to publish a feeds and speeds table, because we do not own a router and any number we invented would be a guess dressed up as advice. The correct figures depend on your spindle, your machine's rigidity, the specific bit and the material, and they vary enough that a wrong table would cost people broken tooling.
The right sources are already public and specific. Bit manufacturers such as Amana Tool, Whiteside and Onsrud publish chip load and feed recommendations for their own tooling. Your machine maker publishes recommended starting parameters for common materials. Vectric ships a tool database with starting values you can edit. Use those, treat them as starting points, and adjust based on how the cut sounds and what the chips look like.
The one piece of guidance that is safe to give generally: V-bits have a small tip that moves very slowly relative to the rest of the cutting edge, so full depth plunges into hard material are where bits break. Ramping into cuts and taking sensible depths per pass are worth setting up properly.
Materials
| Material | How it carves | Notes |
|---|---|---|
| Maple, cherry, walnut | Cleanest edges, holds fine detail | Tight grain, minimal tearout, expensive enough to prototype elsewhere first |
| MDF | Extremely consistent, no grain, no tearout | The classic painted sign material. Very dusty, and edges soak up finish |
| Baltic birch plywood | Good value, decent detail | Visible ply lines in the carved walls, which either suits the piece or ruins it |
| Sign foam (HDU) | Carves effortlessly, takes paint beautifully | The professional outdoor signage choice, and forgiving of aggressive settings |
| Pine and softwoods | Cheap, and prone to fuzz | Sharp tooling and light finishing passes help; expect sanding |
| Acrylic | Sharp and glossy when it goes right | Melting and chip welding are the risks; our acrylic guide covers the material generally |
Our best wood guide compares species in more depth, and much of it carries over from laser work to routing.
Designing for the technique
Fonts with stroke variation carve better. Serif and script faces have thick and thin strokes, and V-carving turns that variation into depth variation. A uniform weight sans serif carves to a uniform depth and looks comparatively flat. If a design looks dull carved, the typeface is usually the reason.
Consider carving the background instead. Clearing the field and leaving the letters raised, with V-carved edges, is an entirely different look from carving the letters into the surface. Both are good. A raised design generally reads better outdoors and from a distance.
Know when relief is the better answer. V-carving is a 2D technique that fakes depth beautifully, but the depth is always a function of line width. If what you actually want is a sculpted surface, a rounded animal head with real contour rather than tapered grooves, that is 3D relief carving and it needs a greyscale depth map instead of an SVG. Our depth map guide covers the difference, and Craftgineer's ReliefMaker builds a carving-ready map from an illustration in the browser.
Respect the tip diameter. Anything narrower than the flat at the bit's tip cannot be carved as a V. Set the minimum feature size in your head before you buy a design, and prefer designs with confident line weights over ones with hair fine detail if you are working small.
Scale changes everything. The same file at 8 inches and at 30 inches has completely different minimum feature sizes relative to your bit. A design that is too fine at small scale is often perfect at sign scale.
 Vintage Porch Signs30 designs, commercial license included$3.99
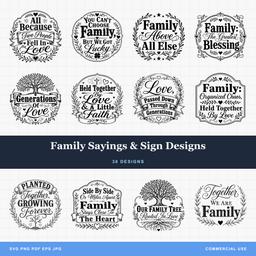 Family Sayings & Sign Designs30 designs, commercial license included$3.99
Finishing
Light sanding first, 220 grit, by hand and with a very light touch. Power sanding rounds the crisp edges you just spent an hour producing.
Paint fill is the classic finish and it is easier than it sounds. Seal the surface, paint over everything, let it settle into the grooves, then sand the flat surface back clean. The paint stays in the carving and you get a sharp two tone sign without any careful brushwork.
Stain and clear coat suits carvings meant to read as wood. Stain first, then a clear finish, and expect the carved walls to take stain differently from the face grain because you are looking at end grain in places.
Epoxy fill gives a flush glossy inlay in the carved areas. It is the most dramatic option and the least forgiving, since bubbles and overfill both mean sanding back a lot of hard material.
Outdoor pieces want an exterior rated finish and attention to the carved recesses, which are exactly where water sits.
Troubleshooting
No toolpath generated. Open contours, almost always. Run the vector validity check.
Flat bottomed letters. The flat depth limit was reached. Raise it, change bit angle, or add a clearing pass deliberately.
Rounded corners where there should be points. That is not a V-carve toolpath. Check that you selected V-carve rather than a pocket or profile operation.
Islands carved where holes should be. Compound path relationships were broken during export. Recombine the counters with their outer shapes.
Fuzzy edges. Dull bit, wrong material for the detail level, or too fast a finishing pass. Softwoods fuzz easily regardless.
Carving is off centre from where you expected. Design position on the stock versus your actual X and Y zero. Simulate with the stock defined the way the machine will actually see it.
Get carving
Every design pack we sell is $3.99, arrives as SVG, PNG, JPG, PDF and EPS, and is built with the closed paths and clean node counts a V-carve toolpath needs. A commercial licence is included, so the signs you carve are yours to sell.
Browse the nature and outdoors collection for cabin and lake house signs, the quotes and text collection for lettering, or the full shop.
For other CNC techniques, read our CNC router SVG guide and the depth map carving tutorial, which covers the very different world of 3D relief work.
Designs for this project
Frequently Asked Questions
How deep does a V-bit cut for a given line width?
It is fixed geometry. Depth equals half the width divided by the tangent of half the bit angle. A 90 degree bit cuts to half the width of the groove, a 60 degree bit to about 0.87 times the width, and a 30 degree bit to about 1.87 times the width. That is why a narrow bit angle produces much deeper cuts on the same artwork.
Why is the bottom of my V-carve flat instead of pointed?
The shape was wider than the bit could reach at the maximum depth you set, so the toolpath flattened out. Either raise the flat depth limit, switch to a wider bit angle that reaches the same width at less depth, or add a clearing pass with an end mill so the flat area is deliberate.
Does V-carving need closed paths?
Yes. V-carving works out depth from the width between two sides of a shape, so it needs a shape with an inside and an outside. An open path has no width to measure and will be treated as a line engraving instead, cutting at a single fixed depth.
Which V-bit angle should I start with?
A 60 degree bit for most signs. It holds fine detail, produces a pleasing depth to width ratio, and handles typical lettering without cutting so deep that thin material becomes a problem. Move to 90 degrees for large bold lettering meant to be read from a distance.